First Start
After installing CuriosPaper and starting your server, here's what happens and what to expect.
Startup Sequence
When the server starts with CuriosPaper, the plugin will:
- Generate
config.ymlwith 9 default accessory slot types (if missing) - Create the
items/directory for custom item definitions - Initialize the Storage Provider (resolves YAML, SQLite, MySQL, or MongoDB backend)
- Run player data auto-migration (if configured and legacy files exist)
- Create the
playerdata/directory for per-player accessory storage (for YAML fallback) - Initialize the resource pack manager and extract default assets
- Register commands (
/baubles,/curios) - Initialize messages from
messages.yml - Start bStats metrics (anonymous usage statistics, plugin ID: 29508)
Console Output
A successful startup will show logs similar to:
[CuriosPaper] Enabling CuriosPaper v2.0.0
[CuriosPaper] CuriosPaper has been enabled!
[CuriosPaper] Loaded 9 slot types.
[CuriosPaper] Loaded 0 custom items.
If you configured a database backend (e.g. SQLite) and enabled auto-migration, you will see additional startup logs:
[CuriosPaper] Auto-migrating 12 player data files to SQLITE...
[CuriosPaper] Migration complete: 12 files migrated to SQLITE
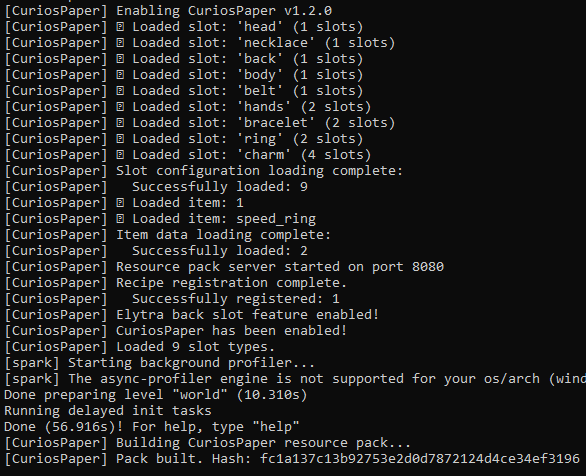
If the elytra back slot feature is enabled and supported:
Default Slot Types
CuriosPaper ships with 9 pre-configured accessory slots:
| Slot | Icon | Slots | Description |
|---|---|---|---|
| Head | Golden Helmet | 1 | Crowns, circlets, headpieces |
| Necklace | Nautilus Shell | 1 | Amulets and pendants |
| Back | Elytra | 1 | Capes and cloaks |
| Body | Diamond Chestplate | 1 | Chest accessories |
| Belt | Leather | 1 | Utility belts and sashes |
| Hands | Leather Chestplate | 2 | Gloves (both hands) |
| Bracelet | Chain | 2 | Bracelets and bangles |
| Ring | Gold Nugget | 2 | Magical rings |
| Charm | Emerald | 4 | Trinkets and charms |
Total: 15 accessory slots per player
Testing the Plugin
- Join the server as a player
- Type
/baubles(or/b) to open the accessory GUI - You should see a double-chest GUI with the 9 slot categories
Next Steps
Head to Getting Started → Core Concepts to learn how the slot system works, or jump to Your First Accessory to create a custom item.